How to Install and Setup Jekyll on Windows?
Jekyll is a static website generator, which you can use it for blog development and website development. After Jekyll 3.0 it’s very easy to install Jekyll on windows 7, windows 8 and windows 10, because most of dependencies are removed for windows users.
Jekyll (built in ruby) is very popular static website generator among others, because
1) It is first static site generator that comes into the web world.
2) It is most recommended by Github pages.
3) Easy to use without any skill of the Ruby language, even I don’t know how to write hello program in ruby.
Note: Many of the old tutorial say, you have to install Python for syntax highlight, but after jekyll 3.0 many of things are changed, so now you don’t need to install python anymore if you’re using Github pages for hosting.
Step 1: Setup Ruby and Ruby Dev Kit..
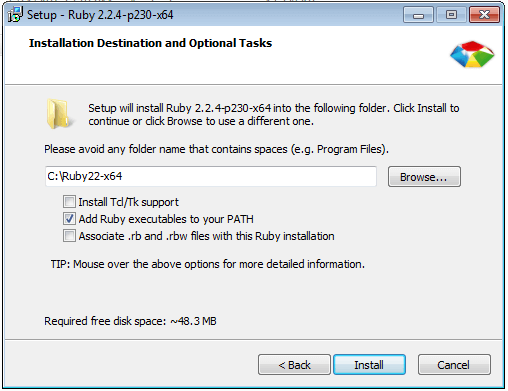
First off, you need to install ruby language in your windows operating system, so click here and download ruby setup file (I recommend to download only stable version of ruby, so don’t download the latest version instead download previous version) and install it on your machine. It will be good if you remember the setup path while installation. And please don’t forget to add a proper environment variable while installation.
You also need to install Ruby Dev kit, so go to the same page, scroll down a little bit and download ruby dev kit as per what operating system you’re using (like 32 bit or 64 bit and which version of ruby you have installed).
Now, extract ruby dev kit anywhere you like, I have extracted it on my own folder like C:/Kit/Ruby/
Now, open CMD (Command Prompt) as administrator, and navigate your ruby dev kit folder with cd command, like cd c:/ then cd kit then cd ruby
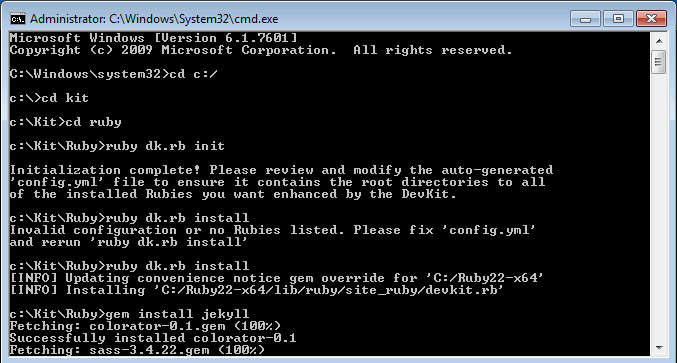
Now, we are in our ruby dev kit folder, now run this command
ruby dk.rb init
Now you will see initialize complete, but you have to modify some config files, otherwise you will see some errors while entering our next command, so let’s modify our config file first.
Now open the config file (from c:/kit/ruby), and add your ruby installation path like this.
---
C:\Ruby22-x64
As you can see, I have set the path as C:\Ruby22-x64, because I have installed (By default) ruby on C drive, but if you ruby installed somewhere else, then you need to add that location.
Now, finally enter this command ruby dk.rb install
Step:2 Install Jekyll gem.
OK, so we have set up a complete ruby environment in our windows operating system, now we need to install Jekyll gem. Well, if you’re not familiar with a gem, then just assume that it is kind of packages, which we can easily install through command line. So for Jekyll gem, hit this command.
gem install jekyll
After executing above command, you’ll see gems are automatically downloaded and installed in few seconds (it’s depend on your Internet speed and gem size).
Now we are ready to create our new Jekyll website.
Step:3 Creating New Jekyll Website.
Now just choose where you want to create your new website, I will create it, in my own folder, like d:/goyllo/newjekyll . You can either create your own folder (like d:/jekyll/blog) with command line or with graphic user interface.

Now you need to navigate that directory with CD command, like
cd d:/ then cd newjekyll
Now we are in our folder, now just enter this command.
jekyll new .
Here we used . (dot) at the end of command, because we want to install our Jekyll site in the same directory, but if you used this command jekyll new blog, then Jekyll will install in subfolder like this d:/goyllo/jekyllnew/blog/. Hope you got my point, what I want to say.
Now you will see the success message like this. New jekyll site installed in d:/Goyllo/newjekyll.
But if you got any bundle error, then please enter these commands first.
$ gem install bundler
$ bundle install
$ bundle exec jekyll new .
Now, if you open your folder (d:/goyllo/newjekyll/), then you will see many of folder and files are automatically generated.
Step 4: Check your live Jekyll website on localhost
Now we are going to execute our last command to see our website live. Refer Fig 3 to understand commands execution.
Jekyll serve --watch
Now as you can see our site is build in less than half second (0.47 s ), and now we just need to enter 127.0.0.1:4000 in our browser.
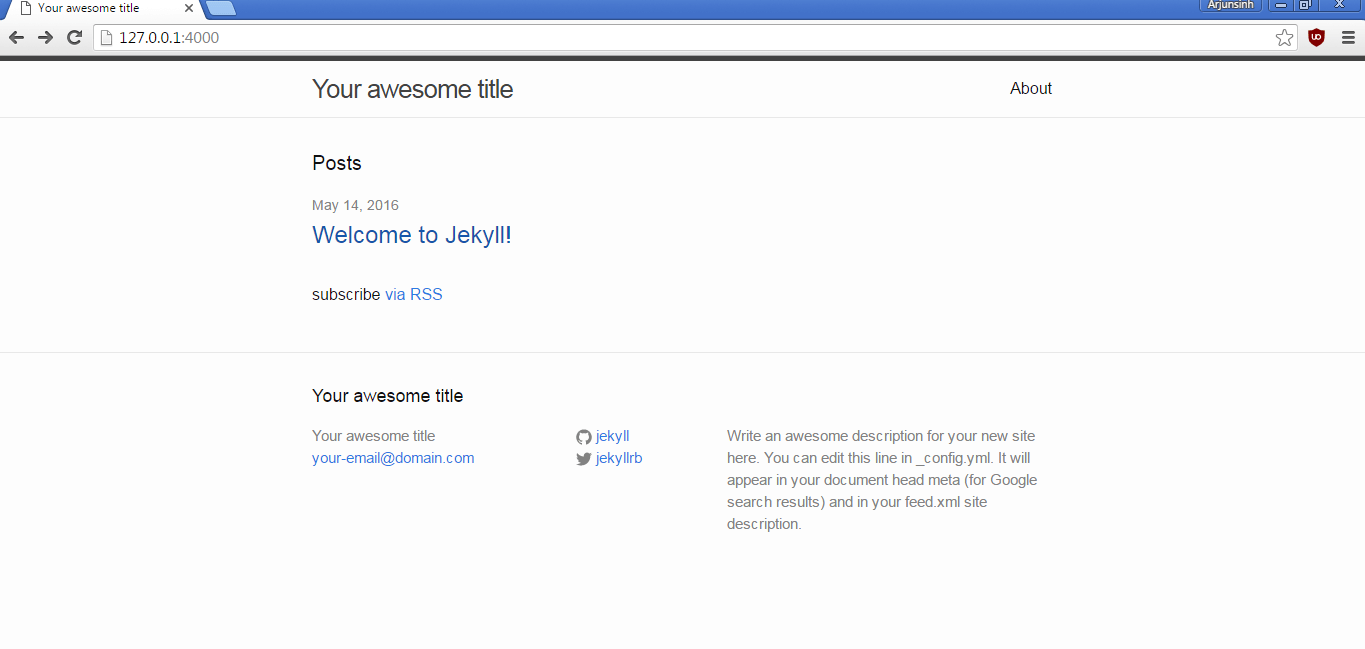
And bingo our site is live in our localhost (127.0.01:4000).
When you enter this command jekyll serve --watch, then you’ll see one another folder (_site) is automatically generated in that directory, and that folder is your website, and Jekyll show that folder in localhost browser.
OK, so this tutorial is end here, but next time when you need to create new Jekyll website, then you don’t need to follow all the procedure from start, just hit this command to create new Jekyll website jekyll new mysecondblog and to see your site live in browser just hit this command jekyll server –watch that’s it.
So basically here we can see our website/blog live in localhost, but to make it live on the Internet so everybody can see it, then you have to deploy it on some live server. You can use github pages and Google firebase to host your site for free, but feel free to choose any host, since our _site folder contain only static files, which supported by all the hosting companies.